
I recently moved to my new apartment and spent all my 2020 savings buying new smart devices, and I think my wife won’t be happy when she reads this article 😆 .
I used to have integrations with IFTTT and Samsung Smart things. But, I was constantly fighting insomnia when I try to find who has access to my home data! So, I decided to migrate my home automations and controls to a local private cloud, and I said it’s time to use the unbeatable Home Assistant! 🙌
In this article, I will show my “ultimate” setup and configuration to get started with Home Assistant in a Docker-based environment.
Going into this project, I had the following requirements:
- Setup a secure remote access to the Home Assistant;
- Ensure high availability and efficient integration with thousands of connected devices;
- Use flow-based UI to program automations and scenes
- Build a solution around free and open-source tools
- Order more coffee capsules! ☕️ ☕️
High-level design
After some research and many POCs, I finally came with the following design.
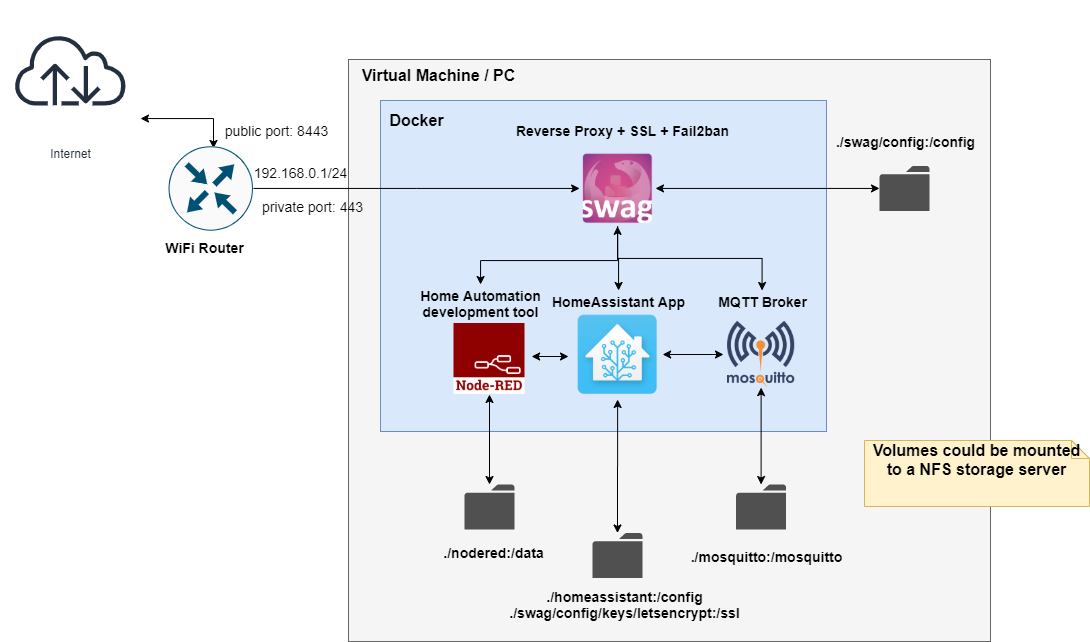
I use Linux SWAG (Secure Web Application Gateway) from linuxserver.io as a reverse proxy. It’s an all-in-one solution that helps to easily setup an Nginx reverse proxy with a built-in certbot client. The utilimate goal is to have an automated free SSL certificate generation and renewal process. It also contains fail2ban for intrusion prevention.
Node-RED is a web editor that makes it easy to wire together flows using the wide range of nodes in the palette that can be deployed to its runtime in a single click. This service will be used to create home automations and scenes.
Eclipse Mosquitto is a lightweight and an open-source message broker that implements the MQTT protocol. It will be used to enable machine-to-machine communication within my IoT network.
Finally, the Home Assistant core application is the central part of my setup. It provides a web UI to control all my connected devices.
Prerequisites
The first thing I did was getting a domain name from duckdns.org and pointed it to my home public IP address. If you don’t know how to get your public IP, you can find it right here: https://whatismyipaddress.com/.
I also configured a port forwarding rule in my WiFi router to allow external traffic to the Home assistant setup. I think it’s important to be able to control your devices from outside. Or you can use your home VPN if you have one!
What if my public IP changes?
Yes, I have a dynamic IP addess and I refuse to pay some additional $$ to get a static IP from my ISP. Fortunately, Duckdns (and most of DNS services) offers a HTTP API to periodically refresh the mapping between the DNS record and my IP address. And my router can do that automatically 🆒.. but you can use any other service or develop your own script.
SWAG Proxy configuration
Next thing I did is to configure the reverse proxy to handle different requests and verify/apply different security rules. The main things to note here :
- I have only one open port: the 443
- I enabled
autheliafor two-factor-authentication (2FA) with Duo. I didn’t include it in my docker setup because I have already an external Authelia server used for another application. Bit, you can find a good tutorial here: https://blog.linuxserver.io/2020/08/26/setting-up-authelia/ - NodeRED and Mosquitto services are accessible only from a local network
192.168.0.1/24 - Optionally, I added another public IP address to be able to access to my HA app using my phone when I’m outside. NordVPN is my friend here!
The Docker compose file
Below is the Docker Compose file. It defines the different services included in the design(HA and satellites). The main things to point out are: URL=mydomain.duckdns.org and the external volumes mapping.
You just need to save this file as docker-compose.yml and run docker-compose up -d . and boom! 💣 Open a browser and go to: https://mydomain.duckdns.org .
NodeRED application is accessible only from the LAN. You can find it here: https://mydomain.duckdns.org/nodered/
Conclusion
This is indeed a bulky article. However, I believe this might as well be complete for someone whos looking out to get themselves into home automation with Home Assistant in a secure Docker-based environment.
